
In the vibrant world of culinary innovation, where creativity meets nostalgia, there exists a whimsical concoction that is as delightful to the palate as it is to the eye: the Whipped Kool Aid. Imagine this: a frothy, colorful cloud of sweetness that dances on your tongue, invoking carefree summer days with every spoonful. This isn’t just a drink; it’s an experience. It’s a playful twist on the whipped beverage trend, and it promises to bring a splash of color and a burst of flavor to your kitchen adventures.
This recipe transforms the classic childhood drink mix into an airy, mousse-like treat, reminiscent of the viral whipped coffee (Dalgona) craze, but with a fruity and tangy twist. With flavors ranging from tropical punch to grape, the options are as varied as a box of crayons. Each scoop is a nostalgic trip down memory lane, but with a grown-up twist that will make you smile.
The Whipped Kool Aid is surprisingly simple to make, requiring only a handful of ingredients and a few minutes of your time. In just about 10 minutes, you can whip up this vibrant delight, making it perfect for those who love instant gratification without sacrificing quality. Whether you’re a kitchen novice or a seasoned cook, this recipe is your ticket to creating something both impressive and fun. So, pull out your whisk and let’s make some culinary magic—it’s time to whip up a little joy!

The Story Behind This Recipe
In the world of culinary trends, where creativity knows no bounds, there’s always room for a delightful surprise. Enter the Whipped Kool Aid phenomenon, a frothy, colorful concoction that’s as visually stunning as it is delightfully nostalgic. It all began as a playful twist on the viral Dalgona coffee trend—a tribute to both our childhood memories and the joy of culinary experimentation.
The origin of Whipped Kool Aid is a testament to the limitless imagination of home cooks and their ability to breathe new life into familiar ingredients. Kool Aid, with its vibrant hues and fruity punch, has been a staple in kitchens and picnic baskets since its creation in the 1920s. Born in Hastings, Nebraska, it was originally a powdered drink mix that was both affordable and easy to prepare, quickly becoming a beloved treat across America.
Fast forward to the 21st century, and Kool Aid found itself in the hands of adventurous food enthusiasts looking to create something new and exciting. Inspired by the creamy, frothy peaks of Dalgona coffee—a craze that swept the globe thanks to its photogenic nature—these innovators wondered what would happen if they swapped coffee for Kool Aid. The result? A whimsical, whipped delight that brought a splash of color and a dose of fun to the kitchen.
This new twist on a classic drink quickly gained traction on social media, with its rainbow of possibilities capturing the imagination of food lovers everywhere. Each vibrant hue and unique flavor of Kool Aid offered a canvas for creativity, encouraging budding chefs to mix, match, and experiment with abandon. The beauty of Whipped Kool Aid lies in its simplicity and versatility, inviting everyone to indulge in a little childlike wonder.
So, whether you’re a seasoned home cook or a curious beginner, Whipped Kool Aid invites you to rediscover the joys of playful cooking. It’s a reminder that sometimes the best culinary creations are born from the simplest ingredients, sprinkled with a touch of nostalgia and a hefty dose of imagination.
Kitchen Gear You’ll Need
So, you’ve decided to embark on the colorful adventure that is the Whipped Kool Aid Recipe—a delightful concoction that promises to elevate your Kool Aid game to new heights. Before we dive into the sugar-spun carnival of flavors, let’s talk about the kitchen gear you’ll need to whip up this frothy delight.
The Mighty Mixer
First on the list is your trusty mixer. While a stand mixer is ideal for this task, a hand mixer will do just fine. The key here is power—you’re going to need some serious muscle to whip air into that Kool Aid cream. If you’re feeling extra ambitious and perhaps have a penchant for bicep workouts, a good old-fashioned whisk will also suffice. Just be prepared for a bit of an arm workout!
Bowl Bonanza
Next, let’s talk bowls. A medium-sized mixing bowl will be your go-to vessel for mixing the Kool Aid and cream. Stainless steel or glass is preferable as they keep the mixture cool, aiding in the whipping process. Make sure it’s deep enough to allow for some vigorous mixing without ending up with a kitchen that looks like a scene from a colorful Kool Aid explosion.
Measuring Tools
Accurate measurements are crucial for this recipe, so dust off those measuring cups and spoons. You’ll need them to ensure you get the perfect balance of Kool Aid to cream. Remember, precision is key when creating this sugary symphony.
Spatula Savoir-Faire
A silicone spatula will be your best friend when it comes to scraping every last bit of your whipped creation from the bowl. It’s also perfect for folding in any additional ingredients you might want to include, like a sprinkle of edible glitter or a dash of vanilla extract.
Serving Suggestions
Finally, don’t forget the serving glasses. Clear glasses or dessert bowls work wonderfully to showcase the vibrant colors of your whipped Kool Aid masterpiece. You might also want to have some colorful straws or tiny spoons at the ready for a fun, retro presentation.
Armed with these kitchen essentials, you’re ready to dive into the whimsical world of Whipped Kool Aid. Just remember to wear your most playful apron—because cooking should always be fun—especially when it involves turning a childhood favorite into a fluffy, delightful dessert!
Ingredients
Imagine diving into a vibrant, fluffy cloud of fruity goodness – that’s what our Whipped Kool Aid Recipe promises! But before we start whipping up this colorful concoction, let’s gather our ingredients. Here’s your shopping list, carefully curated for both precision and a splash of creative possibility.
For the Whipped Kool Aid:
- Heavy Cream: 240 ml (1 cup)
Opt for the freshest heavy cream you can find, with a fat content of at least 36%. This will ensure your whip holds its fluffy peaks. If you’re in a pinch, whipping cream will do, but it might not be as stable. - Kool Aid Powder: 1 packet (7 g)
Choose your favorite flavor! Whether you’re a traditionalist with cherry or a tropical enthusiast with blue raspberry, the choice is yours. If Kool Aid isn’t available, any unsweetened drink mix will do the trick. - Granulated Sugar: 50 g (¼ cup)
Granulated sugar adds the perfect touch of sweetness. For those preferring a softer sweetness, powdered sugar can be used, but reduce the quantity slightly to taste.
For Garnish (Optional, but encouraged for extra pizzazz):
- Fresh Fruit: A small handful
Match your fruit to your Kool Aid flavor for a harmonious pairing. Think strawberries for strawberry Kool Aid or sliced apples for the green apple variety. - Sprinkles or Edible Glitter: A sprinkle
Because who doesn’t love a little sparkle? This is your chance to add a bit of whimsy and fun.
Equipment Notes:
- Mixing Bowl and Electric Mixer: Since we are whipping, a sturdy mixing bowl and an electric mixer are your best friends. Whisking by hand is admirable, but be prepared for an arm workout!
Now that you have your ingredients ready, we’re all set to transform these simple components into a delightful whipped treat that’s sure to brighten up any occasion. Keep your taste buds ready for the zing!
Step-by-Step Instructions
- Gather Your Ingredients and Equipment
First things first, you’ll want to arm yourself with all the goodies: 1 packet of Kool-Aid (any flavor you fancy), 1 cup (240 ml) of heavy whipping cream, 2 tablespoons (25 g) of granulated sugar, and a splash of vanilla extract if you’re feeling adventurous. Also, ensure you have a medium-sized mixing bowl, a hand mixer or stand mixer, and a trusty rubber spatula. This is not the time to go old school with a whisk unless you’re looking for an arm workout. - Chill the Cream
Pop your heavy whipping cream in the freezer for about 10 minutes. Yes, you read that right—freeze, not fridge. Cold cream whips up beautifully, like a fluffy cloud. You want it to be frosty but not frozen solid. While you wait, take a moment to daydream about your flavor choices. Cherry? Grape? The world is your Kool-Aid oyster. - Mix the Dry Ingredients
In your mixing bowl, sprinkle in the entire packet of Kool-Aid and the sugar. Give it a quick stir to combine. The vibrant color of the Kool-Aid will make it look like a rainbow exploded in your bowl, and that’s how you know you’re on the right track. - Add the Cream and Start Whipping
Pour the chilled heavy whipping cream into your bowl of dry ingredients. Start your mixer on a low speed to avoid a splash zone akin to a colorful paintball fight. Gradually increase the speed to medium as the mixture begins to thicken, which should take about 2-3 minutes. If you’re using a stand mixer, feel free to multitask—maybe practice your best victory dance for when you taste your creation. - Watch for Soft Peaks
Keep whipping until soft peaks form. This means when you lift the beaters, the cream should create peaks that gently fold over. If they look like tiny whipped mountain peaks, you’re in the sweet spot. Consider this your Goldilocks moment—not too stiff, not too soft. - Incorporate the Vanilla Extract
If you’re using vanilla extract, now’s the time to add it. Just a splash will do. Whip it in quickly for about 10 more seconds, just until it’s combined. This tiny addition elevates your whipped Kool-Aid from a simple treat to an elegant dessert, and it’s worth every drop. - Check the Consistency
Stop the mixer and check the cream. The texture should be smooth and airy, with the Kool-Aid fully dissolved. If you still feel granules of sugar, give it another quick whip. Taste it to ensure that tangy-sweet flavor is just right. If not, adjust with a tad more sugar or a dash more Kool-Aid. - Serve and Enjoy
Transfer your whipped delight into serving bowls or use it as a topping for cakes, waffles, or fruit. The vibrant color and tantalizing aroma will be a feast for the eyes and nose. If you prefer it extra cold, chill it in the fridge for 30 minutes before serving. Take a moment to appreciate the artistry of your creation before diving in. - Store Leftovers Properly
If you have any leftovers (which is rare but possible), store them in an airtight container in the fridge. They’ll keep for up to 2 days, though the texture might slightly deflate. A quick stir will revive it, bringing back some of that frothy magic. Always remember, food safety first—don’t leave it sitting at room temperature for too long.
And there you have it, a frothy, colorful masterpiece that’s as fun to make as it is to eat!
Tweaks and Additions
Who knew a childhood favorite could be so versatile? Our Whipped Kool Aid Recipe is already a delightful treat on its own, but sometimes a little twist is just what you need to keep things interesting. Whether you’re looking to change up the flavor or adapt for dietary needs, here are some fun tweaks and additions to try.
1. Coconut Cream Dream
For a tropical twist, replace the heavy whipping cream with coconut cream. Not only is this substitution perfect for those who are lactose intolerant, but it also gives the whipped mixture a subtly sweet, nutty flavor. The coconut cream’s density might require slightly longer whipping—around 8 to 10 minutes, rather than the standard 5 to 7—to achieve those perfect peaks. Imagine a piña colada without the hangover!
2. Berry Delight
If you’re a berry enthusiast, try mixing in a handful (about 100g or 3.5 oz) of fresh or freeze-dried berries such as raspberries or strawberries. Pulse them in a food processor until fine, then fold gently into your whipped Kool Aid mixture. This addition adds a burst of natural flavor and a hint of tartness, creating a balanced sweetness. It won’t affect the whipping time, but you might notice a slightly thicker texture.
3. Vegan Vibes
For a vegan-friendly version, swap out the heavy cream for aquafaba (the liquid from a can of chickpeas). While it might sound strange, aquafaba whips up beautifully and provides a fluffy, airy texture. You’ll need to add a tablespoon of cream of tartar to stabilize the peaks, and expect the whipping process to take a bit longer—around 10 to 12 minutes. The result is a lighter, less creamy texture, but still deliciously satisfying.
4. Citrus Zing
Add a teaspoon of freshly grated lemon or lime zest to your mixture for an invigorating citrus pop. The bright aroma and tangy taste will cut through the sweetness, making it a refreshing alternative. This tweak requires no additional time and complements Kool Aid flavors like Lemon-Lime or Tropical Punch beautifully.
5. Matcha Magic
For a sophisticated twist, incorporate a teaspoon of matcha powder into the mix. The earthy, slightly bitter notes of matcha balance the sugary sweetness of the Kool Aid. Plus, it adds a lovely green hue, making it visually stunning. As matcha is a fine powder, it blends seamlessly without altering the whipping time or texture.
With these variations, you can transform your Whipped Kool Aid into an exciting new experience each time. Whether you’re catering to dietary preferences or simply exploring new flavors, these tweaks ensure that everyone can enjoy a spoonful of nostalgia with a modern twist.
Decorating Tips
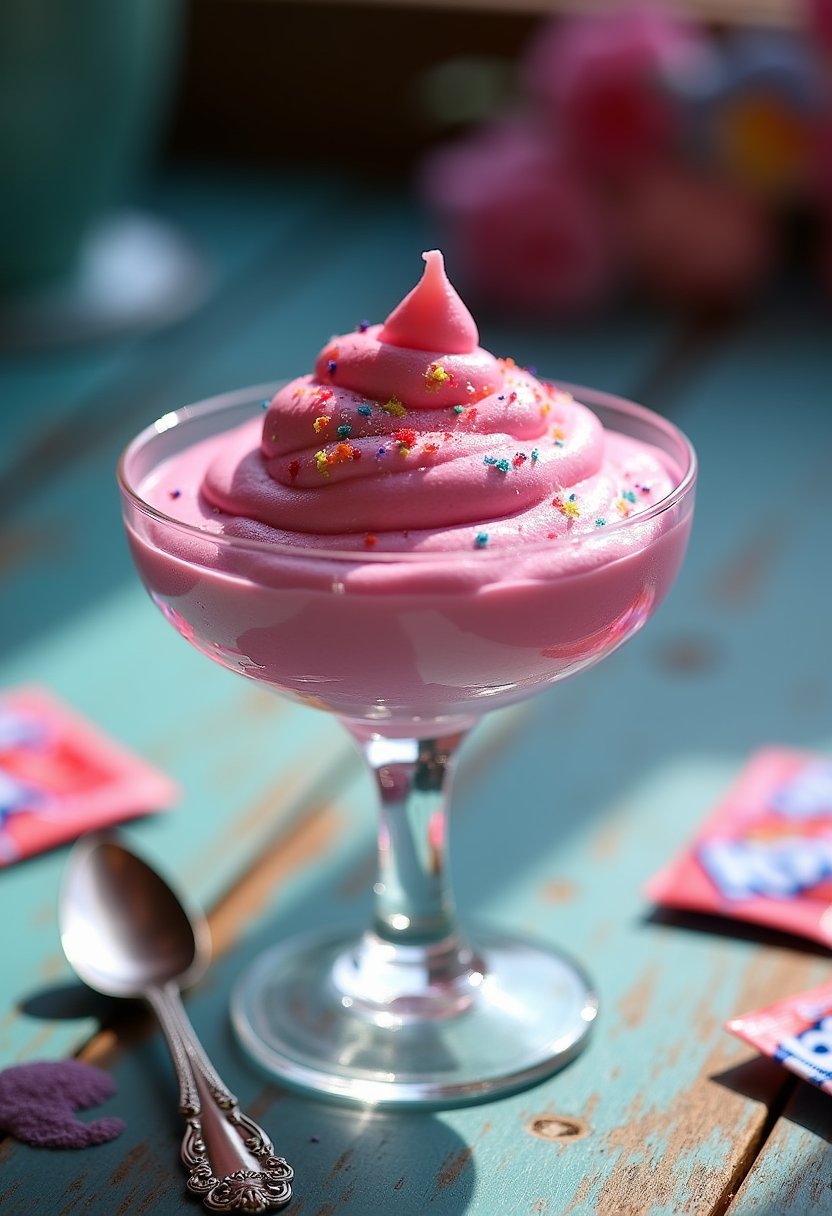
When it comes to the whimsical world of Whipped Kool Aid, decorating your concoction is where the real fun begins. Picture this: a vibrant, fluffy cloud of sweet nostalgia, just waiting to be adorned with edible jewelry. Let’s transform your Whipped Kool Aid into a masterpiece that not only tastes delightful but looks like a dessert straight out of your childhood dreams.
Color Coordination
First off, embrace the colors! Kool Aid is all about those eye-popping hues. If you’ve whipped up a batch using cherry-flavored Kool Aid, think about contrasting its bright red with complementary shades. A few dollops of whipped cream on top can mimic soft, fluffy clouds against a sunset sky. Consider adding a sprinkle of edible glitter or a dash of rainbow sprinkles for that extra sparkle.
Get Creative with Toppings
Toppings are your best friend here. Fresh fruits like raspberries, strawberries, or even blueberries can add a fresh burst of flavor and create a striking contrast against the vibrant Kool Aid base. For an added crunch, try sprinkling crushed graham crackers or a handful of colorful cereal pieces. These not only add texture but also play into the whimsical theme.
Elegant Touches
If you’re aiming for a more sophisticated presentation, consider using a piping bag to swirl the whipped Kool Aid into elegant peaks. A gentle dusting of powdered sugar can add a touch of class and make your dessert look like it’s been lightly kissed by frost.
Vessel Versatility
Don’t forget about the vessel you serve it in! Clear glass jars or dessert cups can showcase the beautiful layers and colors of your creation. For a more rustic feel, serve it in small mason jars tied with a colorful ribbon. For a party, opt for shot glasses for a fun, bite-sized treat that’s easy to grab and go.
Seasonal Flair
Depending on the time of year, you can tailor your decorations to fit the season. In summer, fresh mint leaves or edible flowers can bring a burst of garden freshness. During the holiday season, a sprinkling of crushed candy canes or a few star-shaped sprinkles can add a festive touch.
With these tips, your Whipped Kool Aid will not only be a treat for the taste buds but also a feast for the eyes. Remember, there’s no right or wrong way to decorate. It’s all about letting your creativity run wild and having fun in the process. Happy decorating!
Serving Suggestions
Imagine this: you’ve just whipped up a delightful bowl of vibrant, airy Kool Aid fluff, and now you’re pondering how to serve this cloud-like concoction. Fear not, as the possibilities are as endless as the colors of Kool Aid itself. Let your imagination run wild!
Firstly, consider the classic approach—serve it in a tall glass, reminiscent of a tropical parfait. Layer your whipped Kool Aid with fresh fruits like strawberries, blueberries, or kiwi. Not only does this add a burst of tangy sweetness, but it also provides a lovely visual contrast to the vibrant hues of your creation. Add a dollop of whipped cream on top and a sprig of mint for a refreshing touch.
For a more whimsical presentation, scoop generous dollops onto a plate and sprinkle with colorful sprinkles or edible glitter. This is perfect for a children’s party or any whimsical gathering. You could even place the whipped Kool Aid into ice cream cones for a playful, handheld treat that’s sure to delight both kids and the young at heart.
If you’re feeling adventurous, use your whipped Kool Aid as a topping for pancakes or waffles. The frothy texture pairs surprisingly well with the warm, buttery goodness of breakfast classics. Top it off with a drizzle of maple syrup or a handful of crushed nuts for added depth.
For those seeking an elegant twist, serve it in small, delicate bowls with a side of buttery shortbread biscuits. This is ideal for a tea party or an afternoon gathering where sophistication is key. Pairing it with a subtle, floral tea can enhance the flavor profile and create a memorable experience.
Finally, let’s not forget the simple joy of enjoying it straight from the bowl with a spoon, perhaps while binge-watching your favorite show. After all, sometimes the best serving suggestion is the one that brings you the most joy.
Whichever way you choose to serve your whipped Kool Aid, remember: the key is in the presentation and the joy it brings. So, go ahead, get creative, and most importantly, have fun with it!

Frequently Asked Questions
What type of Kool-Aid flavor works best for whipped Kool-Aid?
Ah, the beauty of Kool-Aid lies in its versatility! You can choose any flavor that tantalizes your taste buds. Classic options like Cherry, Grape, or Tropical Punch are always winners. If you’re feeling adventurous, mix different flavors for a unique twist. Remember, the color of the Kool-Aid will impact the aesthetic of your whipped dream, so pick a hue that brings you joy. Just be sure to use the unsweetened packets, as we’ll be adding our own sugar to the mix.
Why isn’t my Kool-Aid whipping properly?
If your Kool-Aid isn’t getting that cloud-like whip, fear not! One common culprit is the temperature of your heavy cream. It needs to be as cold as the Arctic Tundra, so keep it chilled until the very moment you’re ready to whip. Also, make sure your mixing bowl and beaters are ice-cold by placing them in the freezer for about 10 minutes before starting. If all else fails, try whipping at a slightly higher speed or adding a tablespoon of powdered sugar to give it more structure.
Can I make whipped Kool-Aid in advance?
Absolutely! Whipped Kool-Aid can be made ahead of time, but it’s best enjoyed fresh. If you must prepare it in advance, store it in an airtight container in the refrigerator. It will keep its fluffy texture for up to 24 hours. Before serving, give it a gentle whisk to revive its airy nature. Remember, the fresher, the better when it comes to whipped treats!
How should I store leftover whipped Kool-Aid?
Got leftovers? No problem! Store any remaining whipped Kool-Aid in an airtight container in the refrigerator. It should stay delicious for up to 48 hours, although it may lose a bit of its fluffiness over time. Avoid freezing, as thawing will result in a less-than-ideal texture. If it starts to separate, a quick whisk should bring it back to life – like magic!
Can I substitute heavy cream if I’m lactose intolerant?
For those avoiding lactose, fear not! You can substitute heavy cream with coconut cream for a dairy-free alternative. Simply chill a can of full-fat coconut milk, scoop out the solidified cream, and whip it up just like you would with heavy cream. It’ll add a delightful tropical note to your Kool-Aid concoction. Be aware that the texture might be slightly different, but it’s still a creamy, dreamy delight!
Final Thoughts
As our culinary journey with the Whipped Kool Aid Recipe comes to a close, it’s hard not to marvel at the delightful whimsy this concoction brings to the table. Who knew that a childhood favorite could be reimagined into such a frothy, vibrant creation? This recipe is proof that culinary magic can happen with just a few simple ingredients and a little bit of elbow grease (or an electric mixer, of course).
For those of you who embarked on this colorful adventure, I hope you found the process as much fun as the result is delicious. The light, airy texture of the whipped Kool Aid is a testament to the power of transformation—turning powder into a fluffy cloud of flavor. It’s a reminder that even the simplest ingredients can surprise and delight when given a chance to shine in a new light.
One of the beautiful aspects of this recipe is its versatility. Whether you served it over ice for a refreshing treat, used it as a topping for a unique dessert, or simply enjoyed it by the spoonful, the possibilities are as endless as your imagination. And let’s not forget the kaleidoscope of colors it offers—perfect for brightening up a party spread or adding a splash of fun to a quiet afternoon.
Remember, the joy of cooking is not just in the eating, but in the creating. As you whisk and whip, you’re not just making a treat—you’re crafting an experience, conjuring nostalgia with every vibrant spoonful. So, keep experimenting, keep tasting, and most importantly, keep having fun. After all, isn’t that what cooking is all about? Until next time, may your kitchen be filled with laughter, creativity, and a touch of whimsy.


Leave a Reply